ESP8266(ESP-01, ESP-01S) 웹서버 만들기, 간단한 문자 출력

ESP01 시리즈로 서버를 만들어 봅니다. 서버는 클라이언트(ex 사용자)에게 정보를 제공해주는 시스템이라고 보시면 됩니다. 따라서 우리가 ESP가 만들어 놓은 서버에 브라우저를 통해서 접속을 할 수 있고, 제공하는 특정 정보를 볼 수 있습니다.
웹서버를 만드는 쉬운 예제가 있습니다. 파일-예제-ESP8266WebServer-HellowServer 입니다. 해당 예제를 선택해주면, 아래와 같은 코드들이 나타납니다.
#include <ESP8266WiFi.h>
#include <WiFiClient.h>
#include <ESP8266WebServer.h>
#include <ESP8266mDNS.h>

#ifndef STASSID
#define STASSID "your-ssid"
#define STAPSK  "your-password"
#endif

const char* ssid = STASSID;
const char* password = STAPSK;

ESP8266WebServer server(80);

const int led = 13;

void handleRoot() {
  digitalWrite(led, 1);
  server.send(200, "text/plain", "hello from esp8266!");
  digitalWrite(led, 0);
}

void handleNotFound() {
  digitalWrite(led, 1);
  String message = "File Not Found\n\n";
  message += "URI: ";
  message += server.uri();
  message += "\nMethod: ";
  message += (server.method() == HTTP_GET) ? "GET" : "POST";
  message += "\nArguments: ";
  message += server.args();
  message += "\n";
  for (uint8_t i = 0; i < server.args(); i++) {
    message += " " + server.argName(i) + ": " + server.arg(i) + "\n";
  }
  server.send(404, "text/plain", message);
  digitalWrite(led, 0);
}

void setup(void) {
  pinMode(led, OUTPUT);
  digitalWrite(led, 0);
  Serial.begin(115200);
  WiFi.mode(WIFI_STA);
  WiFi.begin(ssid, password);
  Serial.println("");

  // Wait for connection
  while (WiFi.status() != WL_CONNECTED) {
    delay(500);
    Serial.print(".");
  }
  Serial.println("");
  Serial.print("Connected to ");
  Serial.println(ssid);
  Serial.print("IP address: ");
  Serial.println(WiFi.localIP());

  if (MDNS.begin("esp8266")) {
    Serial.println("MDNS responder started");
  }

  server.on("/", handleRoot);

  server.on("/inline", []() {
    server.send(200, "text/plain", "this works as well");
  });

  server.on("/gif", []() {
    static const uint8_t gif[] PROGMEM = {
      0x47, 0x49, 0x46, 0x38, 0x37, 0x61, 0x10, 0x00, 0x10, 0x00, 0x80, 0x01,
      0x00, 0x00, 0x00, 0x00, 0xff, 0xff, 0xff, 0x2c, 0x00, 0x00, 0x00, 0x00,
      0x10, 0x00, 0x10, 0x00, 0x00, 0x02, 0x19, 0x8c, 0x8f, 0xa9, 0xcb, 0x9d,
      0x00, 0x5f, 0x74, 0xb4, 0x56, 0xb0, 0xb0, 0xd2, 0xf2, 0x35, 0x1e, 0x4c,
      0x0c, 0x24, 0x5a, 0xe6, 0x89, 0xa6, 0x4d, 0x01, 0x00, 0x3b
    };
    char gif_colored[sizeof(gif)];
    memcpy_P(gif_colored, gif, sizeof(gif));
    // Set the background to a random set of colors
    gif_colored[16] = millis() % 256;
    gif_colored[17] = millis() % 256;
    gif_colored[18] = millis() % 256;
    server.send(200, "image/gif", gif_colored, sizeof(gif_colored));
  });

  server.onNotFound(handleNotFound);

  server.begin();
  Serial.println("HTTP server started");
}

void loop(void) {
  server.handleClient();
  MDNS.update();
}
위와 같습니다. 해당 코드들을 찬찬히 살펴보도록 하겠습니다.
#include <ESP8266WiFi.h>
#include <WiFiClient.h>
#include <ESP8266WebServer.h>
#include <ESP8266mDNS.h>
필요한 각종 헤더파일을 include 합니다. 간략하게 설명하면 ESP8266WiFi.h는 ESP8266으로 WiFi 기능을 사용하기 위한 헤더 파일입니다.
WiFiClient.h는 와이파이 클라이언트에서 읽기, 쓰기, 연결 등과 같은 기능을 포함한 헤더 파일입니다. ESP8266WebServer.h는 ESP8266을 서버로 사용할 때 필요한 데이터들을 보내기와 표시하기 등을 포함한 헤더 파일입니다.
ESP8266mDNS.h는 도메인과 관련된 헤더 파일입니다.
#ifndef STASSID
#define STASSID "your-ssid"
#define STAPSK  "your-password"
#endif
접속할 와이파이의 이름과 비밀번호를 작성하는 곳입니다.
const char* ssid = STASSID;
const char* password = STAPSK;

ESP8266WebServer server(80);

const int led = 13;
위에서 저장했던 와이파이 이름과 비밀번호를 변수명에 저장하고, ESP8266WebServer의 객체를 server로 생성시켜 줍니다. 80이라는 매개변수는 http의 기본 포트번호입니다.
추가로 LED 핀 번호도 변수로 저장했습니다.
void handleRoot() {
  digitalWrite(led, 1);
  server.send(200, "text/plain", "hello from esp8266!");
  digitalWrite(led, 0);
}
Root 페이지를 표시해주는 코드가 있는 함수입니다. digitalWrite 함수는 LED를 켜고 끄는 용도이며, server.send(HTTP 응답 코드, 콘텐츠 타입, 콘텐츠)로 이루어져 있습니다. HTTP 응답 코드에는 200과 404가 있습니다.
간략히 설명하면, 200은 성공을 의미하며, 404는 실패를 의미한다고 보시면 됩니다. 페이지를 찾을 수 없을 때 404 not found와 같은 문구를 보신 적이 있으실 겁니다.
콘텐츠 타입과 콘텐츠(텍스트)를 입력하면, 해당 콘텐츠가 서버로 보내집니다.
void handleNotFound() {
  digitalWrite(led, 1);
  String message = "File Not Found\n\n";
  message += "URI: ";
  message += server.uri();
  message += "\nMethod: ";
  message += (server.method() == HTTP_GET) ? "GET" : "POST";
  message += "\nArguments: ";
  message += server.args();
  message += "\n";
  for (uint8_t i = 0; i < server.args(); i++) {
    message += " " + server.argName(i) + ": " + server.arg(i) + "\n";
  }
  server.send(404, "text/plain", message);
  digitalWrite(led, 0);
}
다음 나오는 함수는 연결되지 않을 때, 실행하는 함수입니다. 페이지에 띄울 String을 저장하고, server.send에 404 HTTP 응답 코드와 함께 띄우게 됩니다.
void setup(void) {
  pinMode(led, OUTPUT);
  digitalWrite(led, 0);
  Serial.begin(115200);
  WiFi.mode(WIFI_STA);
  WiFi.begin(ssid, password);
  Serial.println("");
setup 함수 초반 부분입니다. 핀 모드와 시리얼 통신 시작, 와이파이 모드 설정과 시작 코드들이 있습니다.
// Wait for connection
  while (WiFi.status() != WL_CONNECTED) {
    delay(500);
    Serial.print(".");
  }
  Serial.println("");
  Serial.print("Connected to ");
  Serial.println(ssid);
  Serial.print("IP address: ");
  Serial.println(WiFi.localIP());
와이파이가 연결될 때까지 기다렸다가, 연결이 되면, SSID와 Local IP를 시리얼 통신으로 알려줍니다.
if (MDNS.begin("esp8266")) {
    Serial.println("MDNS responder started");
  }
esp8266 호스트 이름으로 MDNS(Multicast Domain Name System)를 실행합니다. 이후 192.168.0.1와 같은 IP 주소 말고도 esp8266/local 과 같은 도메인으로 접속할 수 있게 합니다.
하지만 이 부분은 윈도우, 안드로이드에서는 어렵습니다.
server.on("/", handleRoot);

  server.on("/inline", []() {
    server.send(200, "text/plain", "this works as well");
  });

  server.on("/gif", []() {
    static const uint8_t gif[] PROGMEM = {
      0x47, 0x49, 0x46, 0x38, 0x37, 0x61, 0x10, 0x00, 0x10, 0x00, 0x80, 0x01,
      0x00, 0x00, 0x00, 0x00, 0xff, 0xff, 0xff, 0x2c, 0x00, 0x00, 0x00, 0x00,
      0x10, 0x00, 0x10, 0x00, 0x00, 0x02, 0x19, 0x8c, 0x8f, 0xa9, 0xcb, 0x9d,
      0x00, 0x5f, 0x74, 0xb4, 0x56, 0xb0, 0xb0, 0xd2, 0xf2, 0x35, 0x1e, 0x4c,
      0x0c, 0x24, 0x5a, 0xe6, 0x89, 0xa6, 0x4d, 0x01, 0x00, 0x3b
    };
    char gif_colored[sizeof(gif)];
    memcpy_P(gif_colored, gif, sizeof(gif));
    // Set the background to a random set of colors
    gif_colored[16] = millis() % 256;
    gif_colored[17] = millis() % 256;
    gif_colored[18] = millis() % 256;
    server.send(200, "image/gif", gif_colored, sizeof(gif_colored));
  });
server.on이라는 함수로 해당 디렉토리에 작동할 함수들을 설정해줍니다.
192.168.0.1/ 에는 handleRoot
192.168.0.1/inline 에는 뒤에 나오는 "this works as well"를 보내는 코드
192.168.0.1/gif 에는 gif 이미지
를 표시할 수 있도록 설정합니다. gif는 16진수로 되어 있는 숫자 코드로 저장합니다.
server.onNotFound(handleNotFound);

server.begin();
Serial.println("HTTP server started");
서버에서 찾지 못하는 경우 handleNotFound를 실행하도록 하고, 이후 server.begin으로 웹서버를 실행합니다.
void loop(void) {
  server.handleClient();
  MDNS.update();
}
루프 함수는 간단합니다. server에 요청되는 것이 있으면 처리하는 함수와 MDNS를 계속 업데이트하는 함수입니다.
이제 업로드를 해봅니다. 업로드는 업로드 관련 글을 확인해보세요.

업로드를 하고, 시리얼 모니터를 켜면, 와이파이에 접속됨을 알려줍니다. 와이파이에 접속되지 않으면 나타나지 않습니다. 그리고 local IP 값을 알려줍니다. 이 값을 복사하여 브라우저에 복사해 봅니다.
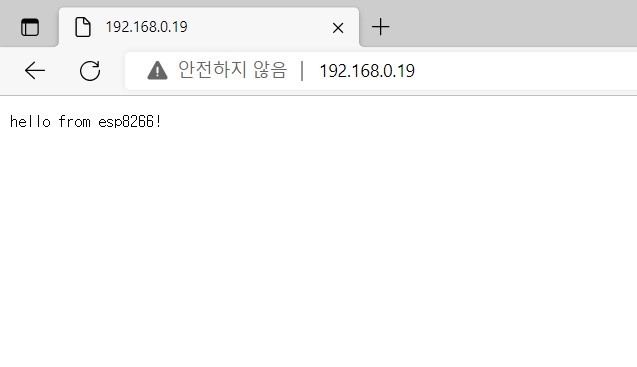
이전에 설정했던 handleRoot 함수의 내용이 실행된 것을 볼 수 있습니다. 192.168.0.19/inline, 192.168.0.19/gif에도 각각 접속해서 정확하게 표시가 되는지도 확인합니다.


'개발 > ESP32, ESP8266' 카테고리의 다른 글
| ESP8266(ESP-01, ESP-01S) SSE, 서버에서 클라이언트에게 데이터 전송 (2) | 2022.10.30 |
|---|---|
| ESP8266(ESP-01, ESP-01S) 웹서버 만들기, Html 출력하기 (0) | 2022.10.25 |
| ESP8266(ESP-01, ESP-01S) 와이파이 리스트 검색 (0) | 2022.10.09 |
| ESP8266(ESP-01, ESP-01S) 개요, 업로드하기 (0) | 2022.10.04 |
| [ESP32 에러] rst:0xf (BROWNOUT_RST),boot:0x29 (SPI_FAST_FLASH_BOOT) (0) | 2022.09.27 |